Contents
Chamber impact impression
In order to select or design a bullet that will have a proper fit in a specified chamber, an impact impression will produce a medium that will enable the most accurate and precise measurements of the critical bullet fit areas. ( Chamber length - Neck, length & diameters - step length & angle - free bore, length & diameters - leade length & angle - bore dia. - groove dia. )
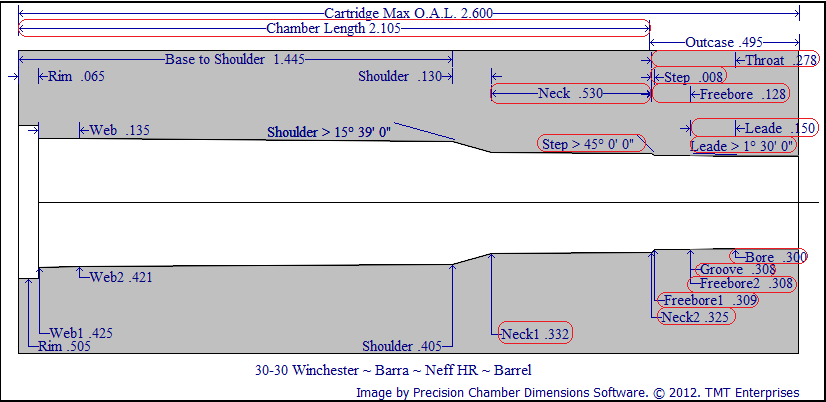
Care must be taken when making an impact impression as forgetting a step, such as proper lubrication of the impression, could cause the impression to stick in the chamber.
You will need the following:
A steel or brass rod slightly smaller than the bore diameter of the barrel and approximately 6 inches longer than the distance from the muzzle to the bolt face.
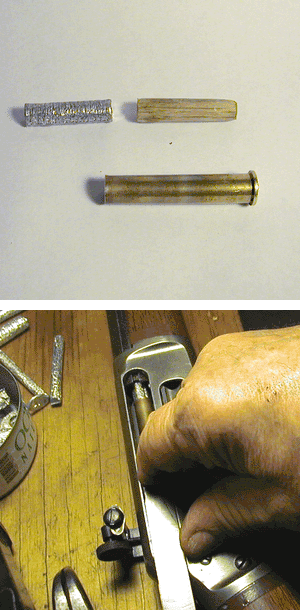
A an un sized cartridge case, fired in the chamber ( this cartridge will not be reusable).
A propane torch to anneal the neck portion of the cartridge case.
A short section of rod or a hardwood dowel that will be a snug fit in the cartridge case neck while resting on the web and extending up into the bottom 1/2 of the length of the neck of the casing.
A gas check of the same caliber as the barrel or a small, fired cartridge case that will fit over the end of the steel or brass rod and also slide down the bore of the barrel.
A pure lead bullet, wire or cast slug that will be a close fit to the bore diameter of the barrel.
A good hammer that will allow you to pound (not tap) the pure lead slug into the shape of the throat and rifling area.
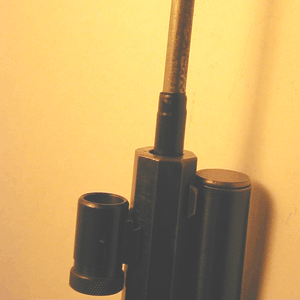
Step 1. Prepare the Brass or Steel Rod.
Cut the brass or steel rod to a length that is 6 inches longer that the distance from the bolt face to the barrel crown making sure that the cuts are square and of full diameter.
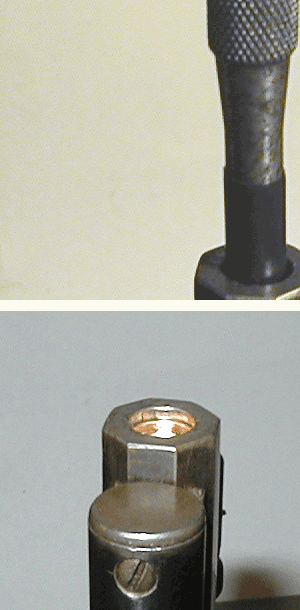
The rod will need to be wrapped with electrical or masking tape at about 6 inch intervals with enough wraps to produce a thickness that will allow a close fit down the bore.
The top wrapping of tape on the rod should be of sufficient length and positioned so that, when the rod starts and ends the pound impression, the tape will not allow any contact between the rod and crown of the barrel.
Step 2. Prepare the lead slug.
If you use a cast bullet, it must be cast of pure lead and have a bore riding portion that is long enough to be positioned far enough into the bore so that after being pounded into shape, it will be of sufficient length to reveal the end of the throat and part of the rifling.
The problem with a cast bullet is that the lube grooves and bands sometimes will not completely fill the throat area and may cause difficulty when attempting to measure the features of the impression.
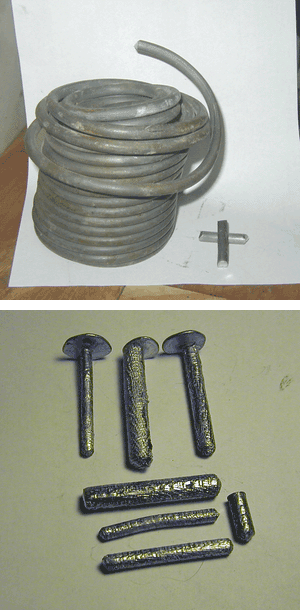
It works better to use a piece of pure lead wire or a pure lead cast slug with a diameter that will allow a close fit in the bore.
99.99% pure lead wire may be commercially obtained and priced by the foot at places such as Roto Metals.
A Hardwood Slug Mold can also be made that will produce an acceptable slug for the impression.
The wire section or slug should be of sufficient length to reveal approximately 1/2 inch of the barrel rifling.
For larger calibers about 2 inches and for the smaller calibers about 1 1/2 inches is sufficient. The length of the slug will depend on the throat configuration and it would be wise to start short and then, if necessary, make another impression with a longer slug.
If the slug is too long, it may be difficult to remove the impression from the chamber.
Step 3. Prepare the cartridge case.
Trim the cartridge case neck back about 1/8" to allow the impacted lead to reflect the actual chamber end dimensions.
Use a propane torch to heat the neck area of the cartridge case to a temperature that just begins to show a dull red glow. This produces a very soft area of the neck that will expand to chamber dimension and have very little spring back when removed from the chamber. (this is a softer anneal than is normally produced when properly annealing a re loadable case to provide adequate neck tension)
Next, flare the case mouth enough so that, when chambered, the flare will scrape the sides of the chamber neck portion. (a pair of needle nose pliers works well for this)
Cut off a piece of your pound rod or a hardwood dowel that will be a snug fit in the neck of the cartridge and of sufficient length to rest on the bottom web of the case and extend half way up into the neck of the case.
The lower portion of this short section of dowel or rod may need to be tapered to rest flat on the web portion of the case and not contact and consequently expand the lower side walls of the case during the impact process.
Some advocate filling the cartridge case with lead instead of a rod or dowel. I have found that, in some cases, the lead will expand the body of the cartridge case below the neck to the point where it will grip the chamber walls and cause great difficulty in removing the impact impression.
Step 4. Prepare the chamber and cartridge/slug.
The chamber and cartridge case and slug must be clean and lightly lubricated.
Use chamber and bore brushes with bore cleaner to thoroughly clean the chamber and the lower 1 or 2 inches of rifling. It is important that any carbon or lead build up deposited between the end of the case and the start of the throat be completely removed.
Clean out any residual bore cleaner and apply a light film of case resizing lubricant in the chamber and on the outside of the cartridge case and the lead slug.
Place the short rod or dowel into the case, insert the slug into the case neck, contacting the dowel or rod, carefully chamber the combination then close and lock the bolt assembly.
Stand the firearm upon a firm no-marring surface in such a manner that it may be securely positioned and held while pounding on the rod.
Step 5. Make the impression.
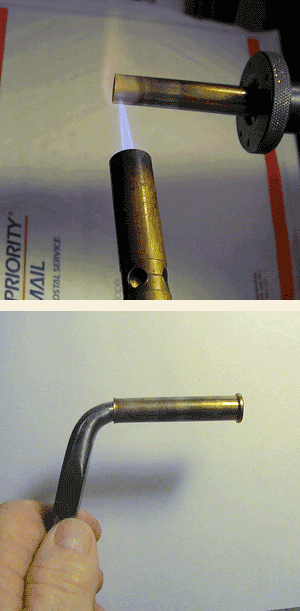
If you are not using a small caliber case on the end of the pound rod, start a gas check ( base down ) on the muzzle crown and with a short section of the pound rod, flat punch or hard wood dowel, while being very careful not to do any damage to the crown, tap the gas check 1/2 inch or so down into the bore then use the tape wrapped, brass or steel rod to push the check on down into the bore until contact with the lead slug is made.
Making sure that the tape wrapping on the rod is protecting the muzzle crown of the barrel, wrap one hand around the barrel end and rod then pound smartly on the rod. (If you miss the rod with the hammer, your hand will heal, the muzzle crown will not)
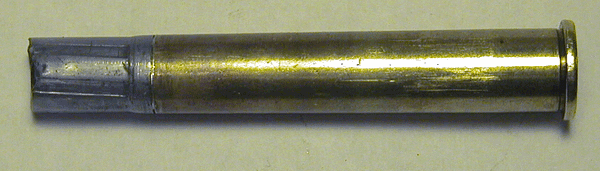
Continue pounding until the sound of the impact dramatically changes and the rod and hammer seem to have a bounce. This will indicate that the lead has completely upset into the chamber and a full impression is formed.
Step 6. This is very important.
Open the lever or bolt and, while applying a light,,steady pressure to the extractor, tap lightly on the rod, so as not to deform or expand the soft lead impression, and carefully extract the impression from the chamber, being very careful not to drop or mar the exposed soft lead.
Do not try to extract the case with the extractor. This may pull the slug out of the case. Place just enough pressure on the bolt, lever or slide to eliminate any resistance to tapping out the impression with the hammer and rod.
Step 7. And this is the most important step of all.
Visually inspect the chamber and bore for any debris or residue from the impact process then clean and re oil the chamber and bore with an appropriate lubricant/rust inhibitor.
Copyright © 2014. TMT Enterprises. All rights reserved.